

Recessed Gun Safe Installation and Usage Instructions
Thank you for purchasing a Bellewood Designs Recessed In Wall Gun Safe. Below are a detailed set of instructions for your new gun cabinet. If you have any questions please call or text us at 502-771-1596, use the Chat Now option on this page or email us at support@bellewooddesigns.com.
Note that your recessed gun safe can be mounted on the wall or in the wall. If you prefer to mount your cabinet on the wall, follow this link for instructions.
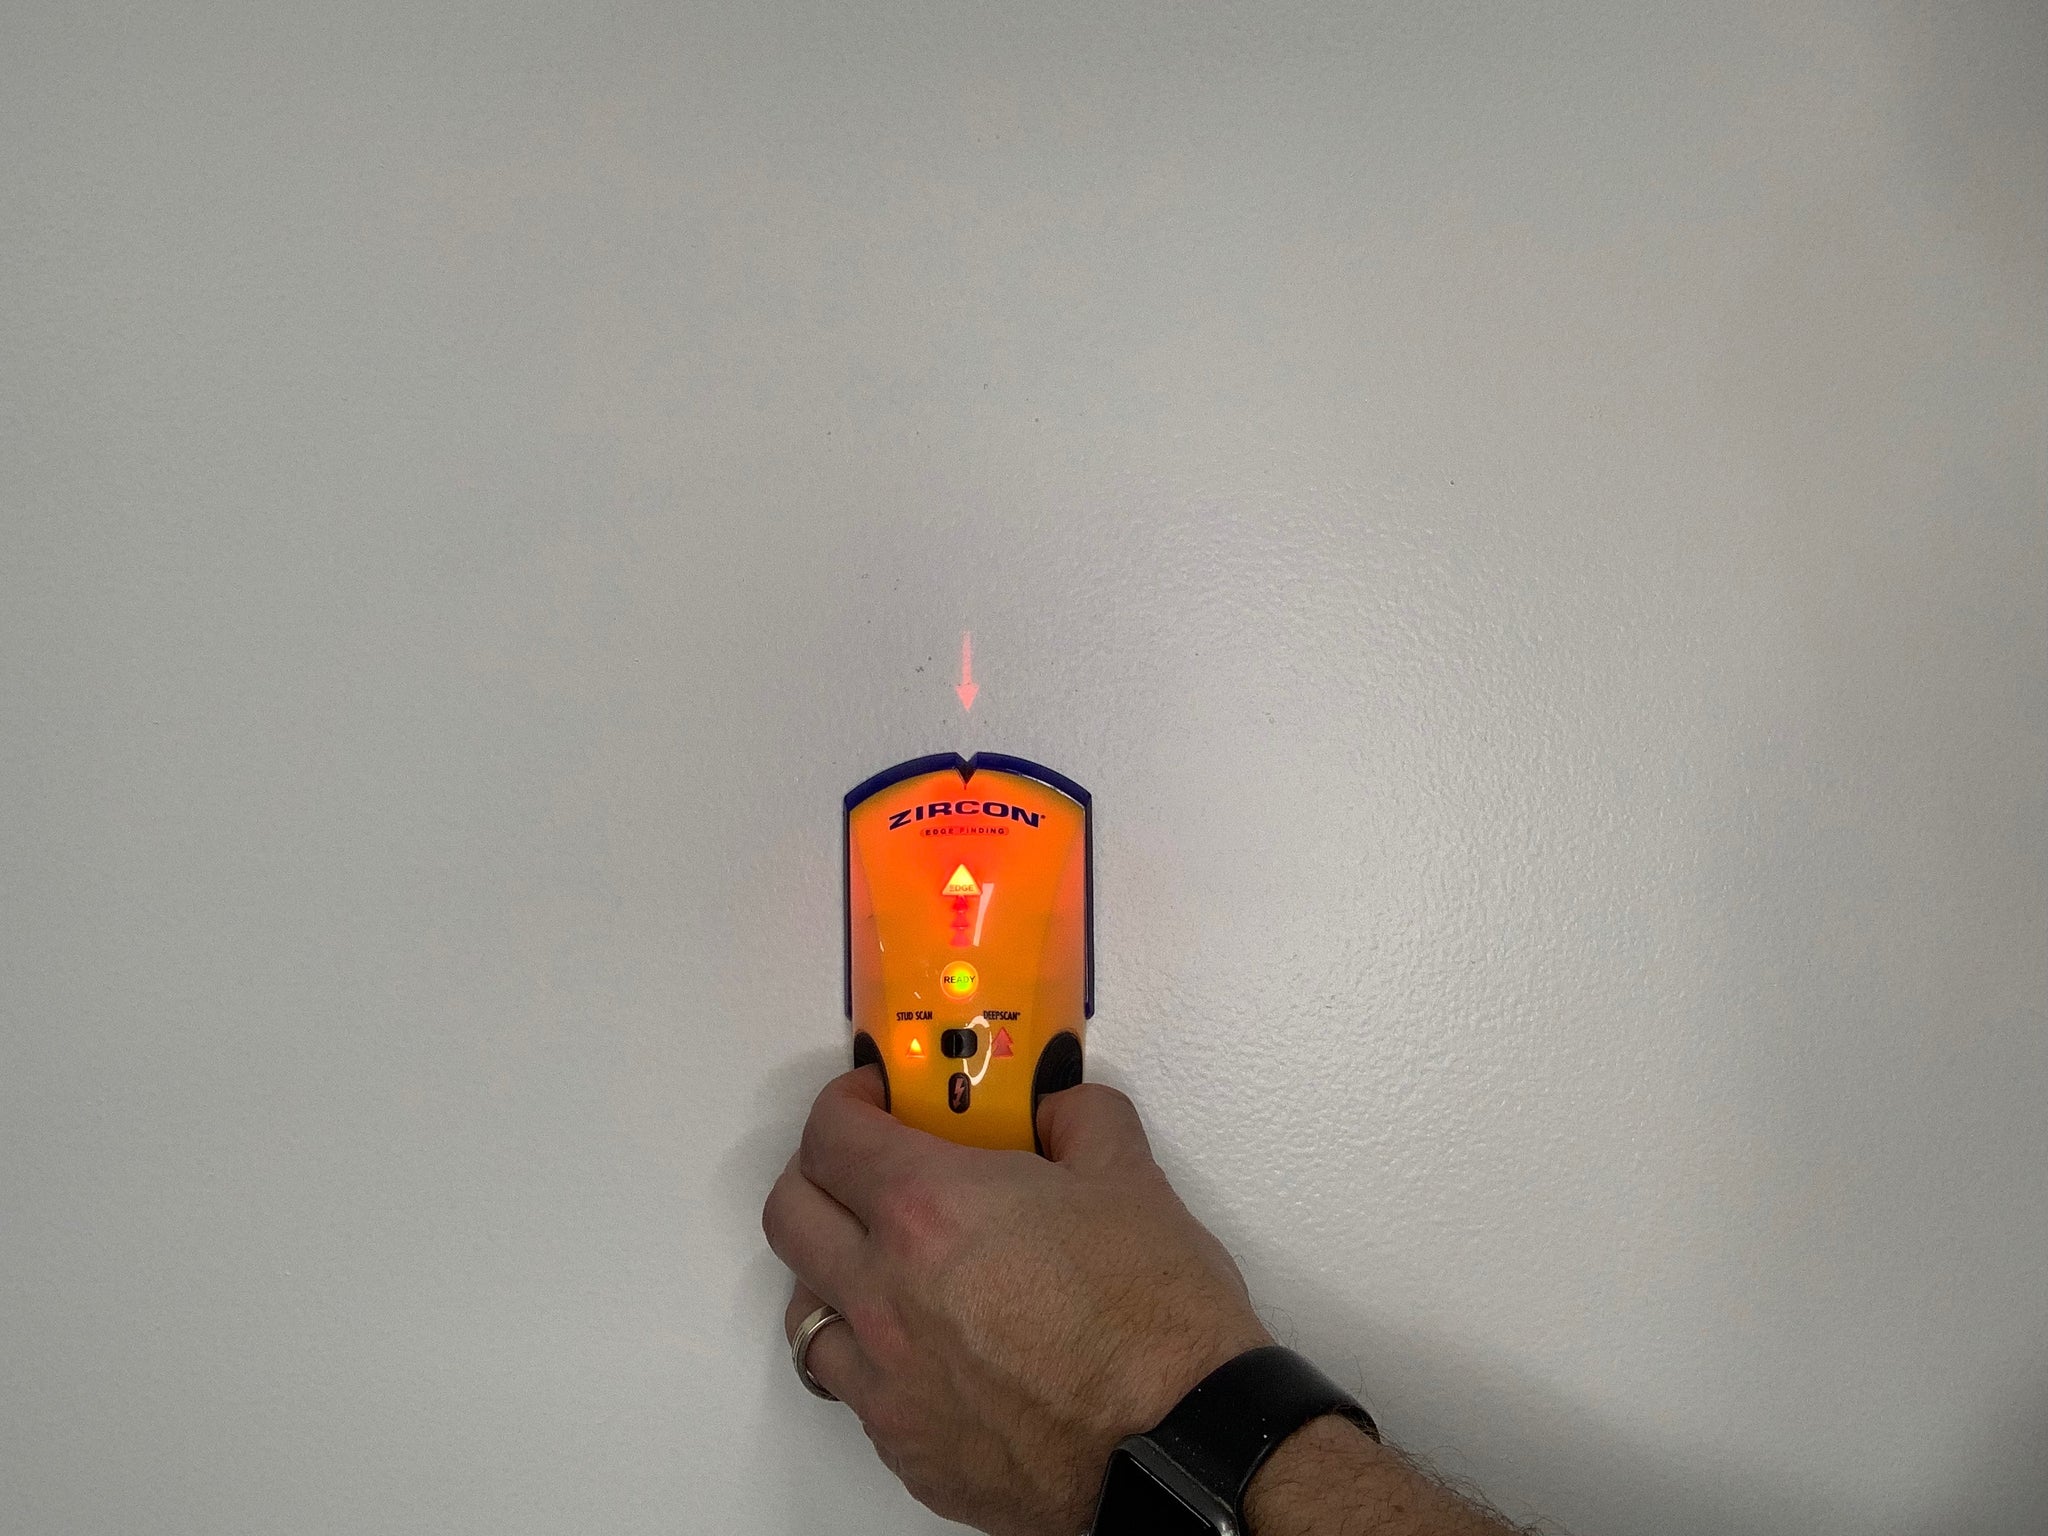
Step 1: After you find a place on your wall you would like to install your recessed cabinet, use a stud finder to locate the first stud and make a mark to notate it's INSIDE edge.

Step 2: Use a tape measure and starting from the mark you made on the inside edge of the first stud, measure 14 7/16" and make a second mark. In standard framing studs are spaced 16" on center. That leaves 14 1/2" of space between each stud and we want to mark slightly less than that. It's always better to cut short and trim up rather than cut it too large!

Step 3: Get your new recessed safe and a small level. Place the cabinet LEVEL against the wall in between the two marks you made. Use a pencil and mark along the top edge of your safe.


Step 4: Use a box knife with a sharp blade and slowly begin to score along the line that you made. Do not make your cut any longer than the line. Using moderate pressure, continue to score along the line until the blade has completely cut the drywall. Patience is key here, use a straight edge if needed.


Once your blade has cut through the drywall, make sure you cut it all the way to the edge of each stud.
Step 5: Now that you know where the absolute edge of each stud is, you can use a level to mark the vertical lines for each side of the cabinet.

Place the level on the edge of the cut line, and mark a straight line down the length of the stud. Repeat the step for the other side as well.

Now that you have the top line cut and the two vertical lines for the sides marked, place the cabinet against the wall and mark the line along the bottom.

Step 6: You can now use your knife to score along the lines and cut the drywall out.


Step 7: Now that you have the wall opened, you need to check for fit. Hopefully you cut it just a bit small and can now do some trimming to get the cabinet to fit tightly.

For this installation, the hole was a bit too small so we made some marks to finalize the cuts.


Remove all of the necessary drywall so your cabinet will fit into the space.
Step 8: Slide the cabinet into the opening and use the key to open the cabinet.


Step 9: There are four predrilled holes, two in each side of the cabinet. Use the includes screws to mount the cabinet to the studs.

Step 10: That's it! You can now customize the included foam insert and safely and discreetly store your gun - no one will ever know what's behind the wall decoration!

Thank you for purchasing a Bellewood Designs Recessed In Wall Gun Safe. Below are a detailed set of instructions for your new gun cabinet. If you have any questions please call or text us at 502-771-1596, use the Chat Now option on this page or email us at support@bellewooddesigns.com.
Note that your recessed gun safe can be mounted on the wall or in the wall. If you prefer to mount your cabinet on the wall, follow this link for instructions.
Step 1: After you find a place on your wall you would like to install your recessed cabinet, use a stud finder to locate the first stud and make a mark to notate it's INSIDE edge.
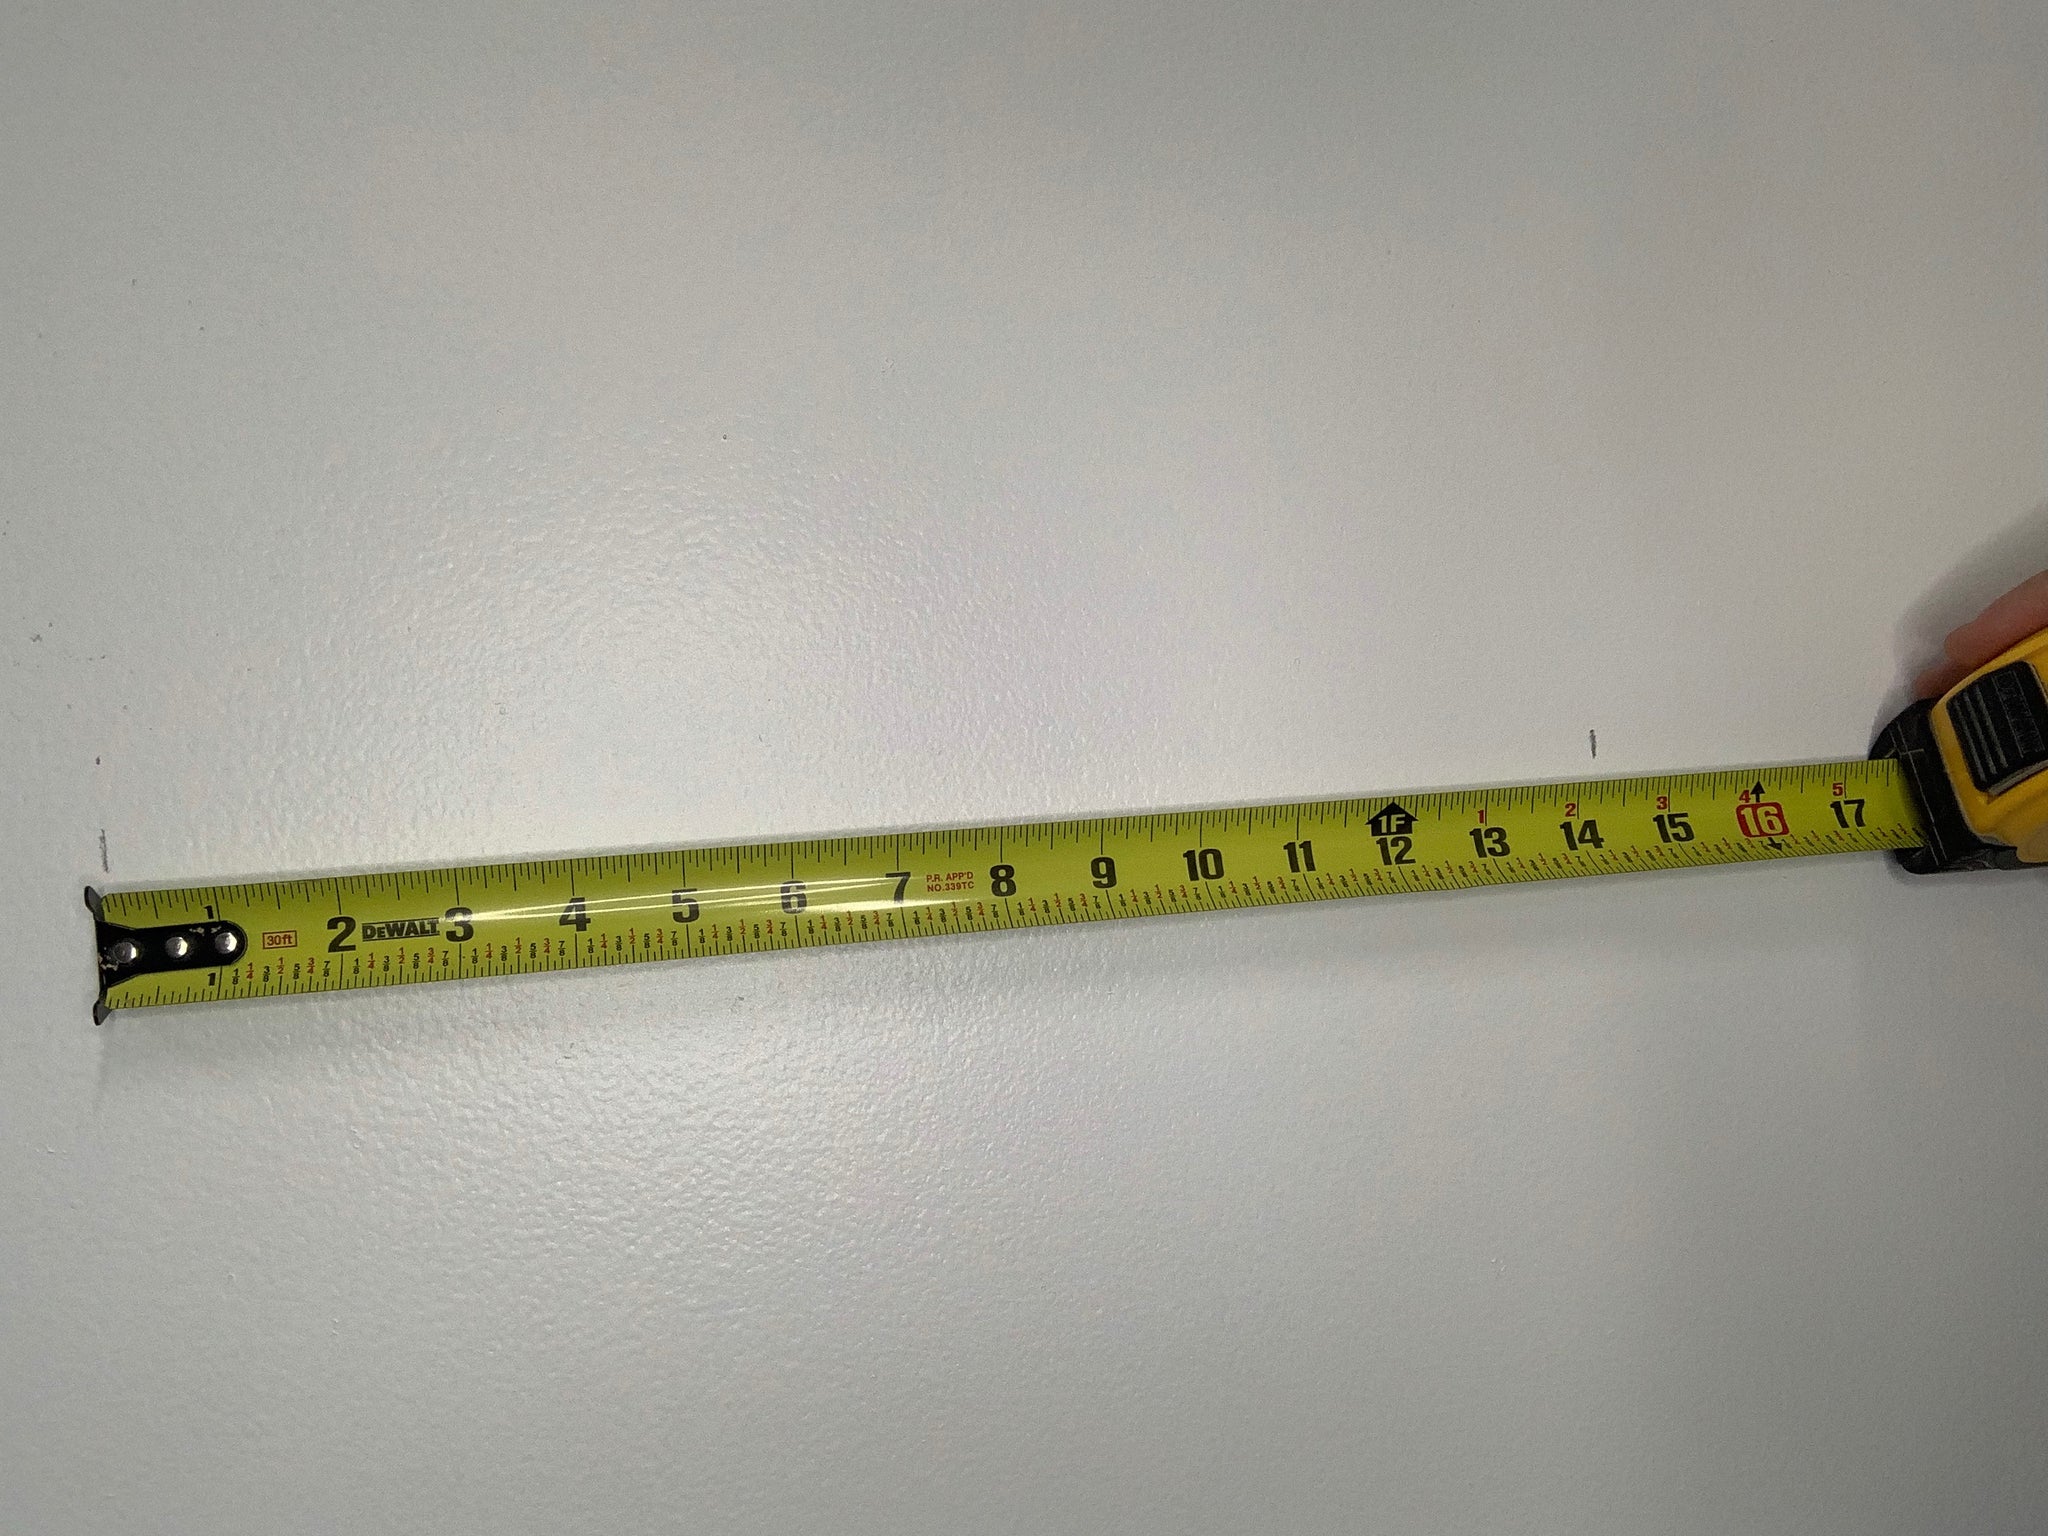
Step 2: Use a tape measure and starting from the mark you made on the inside edge of the first stud, measure 14 7/16" and make a second mark. In standard framing studs are spaced 16" on center. That leaves 14 1/2" of space between each stud and we want to mark slightly less than that. It's always better to cut short and trim up rather than cut it too large!
Step 3: Get your new recessed safe and a small level. Place the cabinet LEVEL against the wall in between the two marks you made. Use a pencil and mark along the top edge of your safe.


Step 4: Use a box knife with a sharp blade and slowly begin to score along the line that you made. Do not make your cut any longer than the line. Using moderate pressure, continue to score along the line until the blade has completely cut the drywall. Patience is key here, use a straight edge if needed.
Once your blade has cut through the drywall, make sure you cut it all the way to the edge of each stud.


Step 5: Now that you know where the absolute edge of each stud is, you can use a level to mark the vertical lines for each side of the cabinet.
Place the level on the edge of the cut line, and mark a straight line down the length of the stud. Repeat the step for the other side as well.
Now that you have the top line cut and the two vertical lines for the sides marked, place the cabinet against the wall and mark the line along the bottom.


Step 6: You can now use your knife to score along the lines and cut the drywall out.


Step 7: Now that you have the wall opened, you need to check for fit. Hopefully you cut it just a bit small and can now do some trimming to get the cabinet to fit tightly.
For this installation, the hole was a bit too small so we made some marks to finalize the cuts.
Remove all of the necessary drywall so your cabinet will fit into the space.


Step 8: Slide the cabinet into the opening and use the key to open the cabinet.


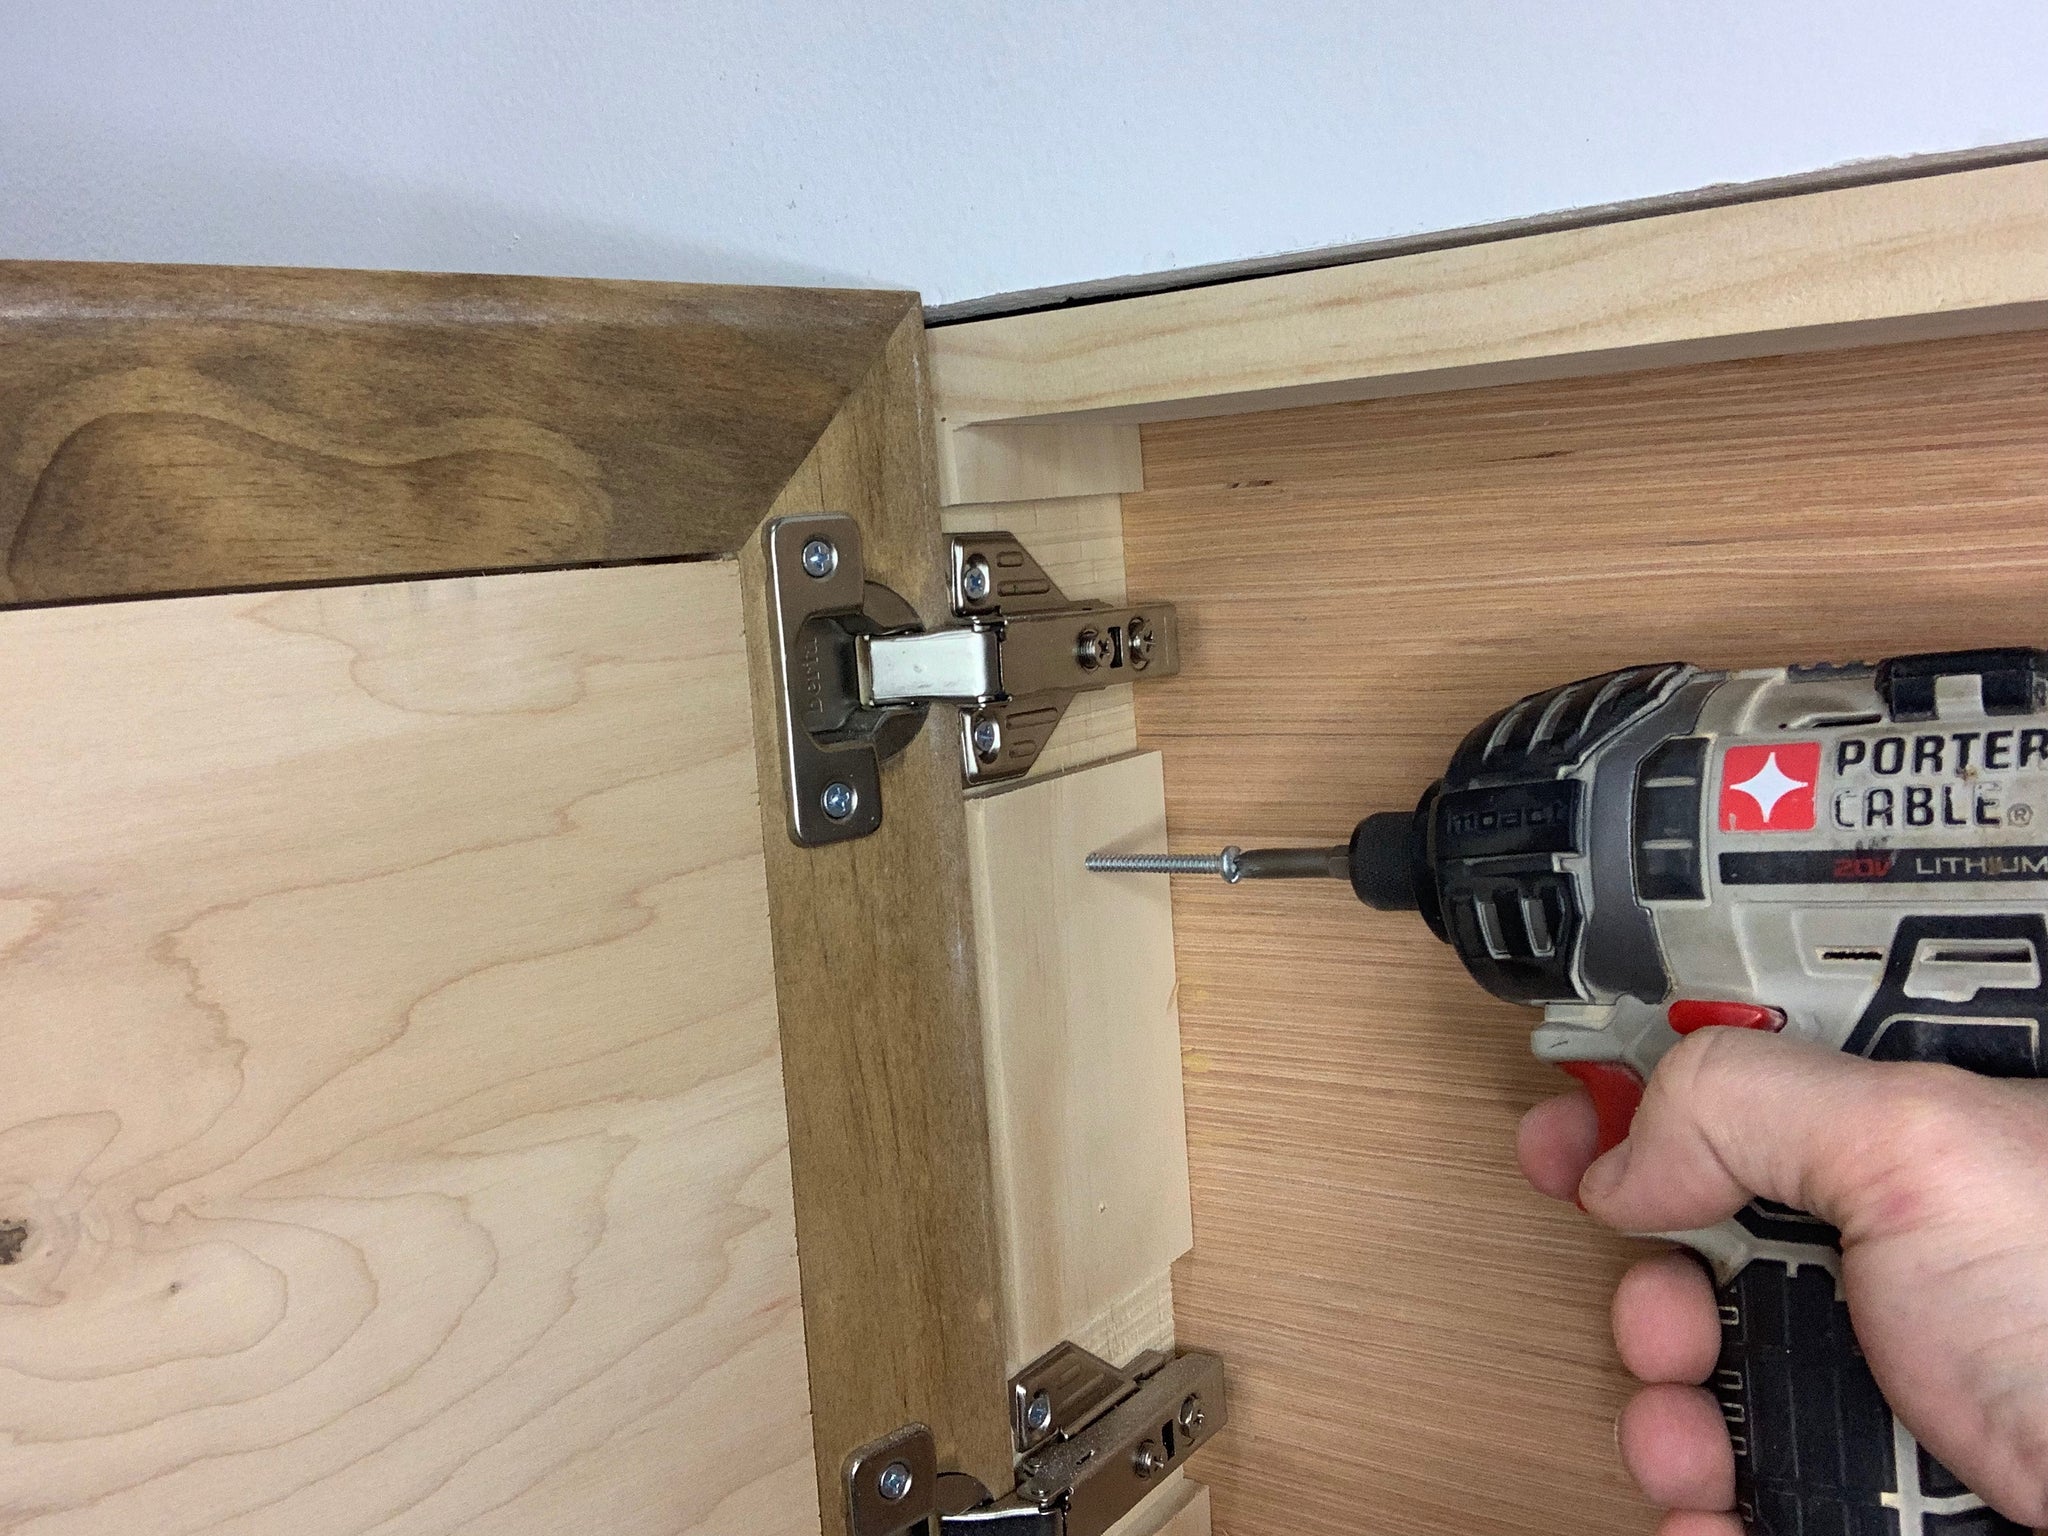
Step 9: There are four predrilled holes, two in each side of the cabinet. Use the includes screws to mount the cabinet to the studs.
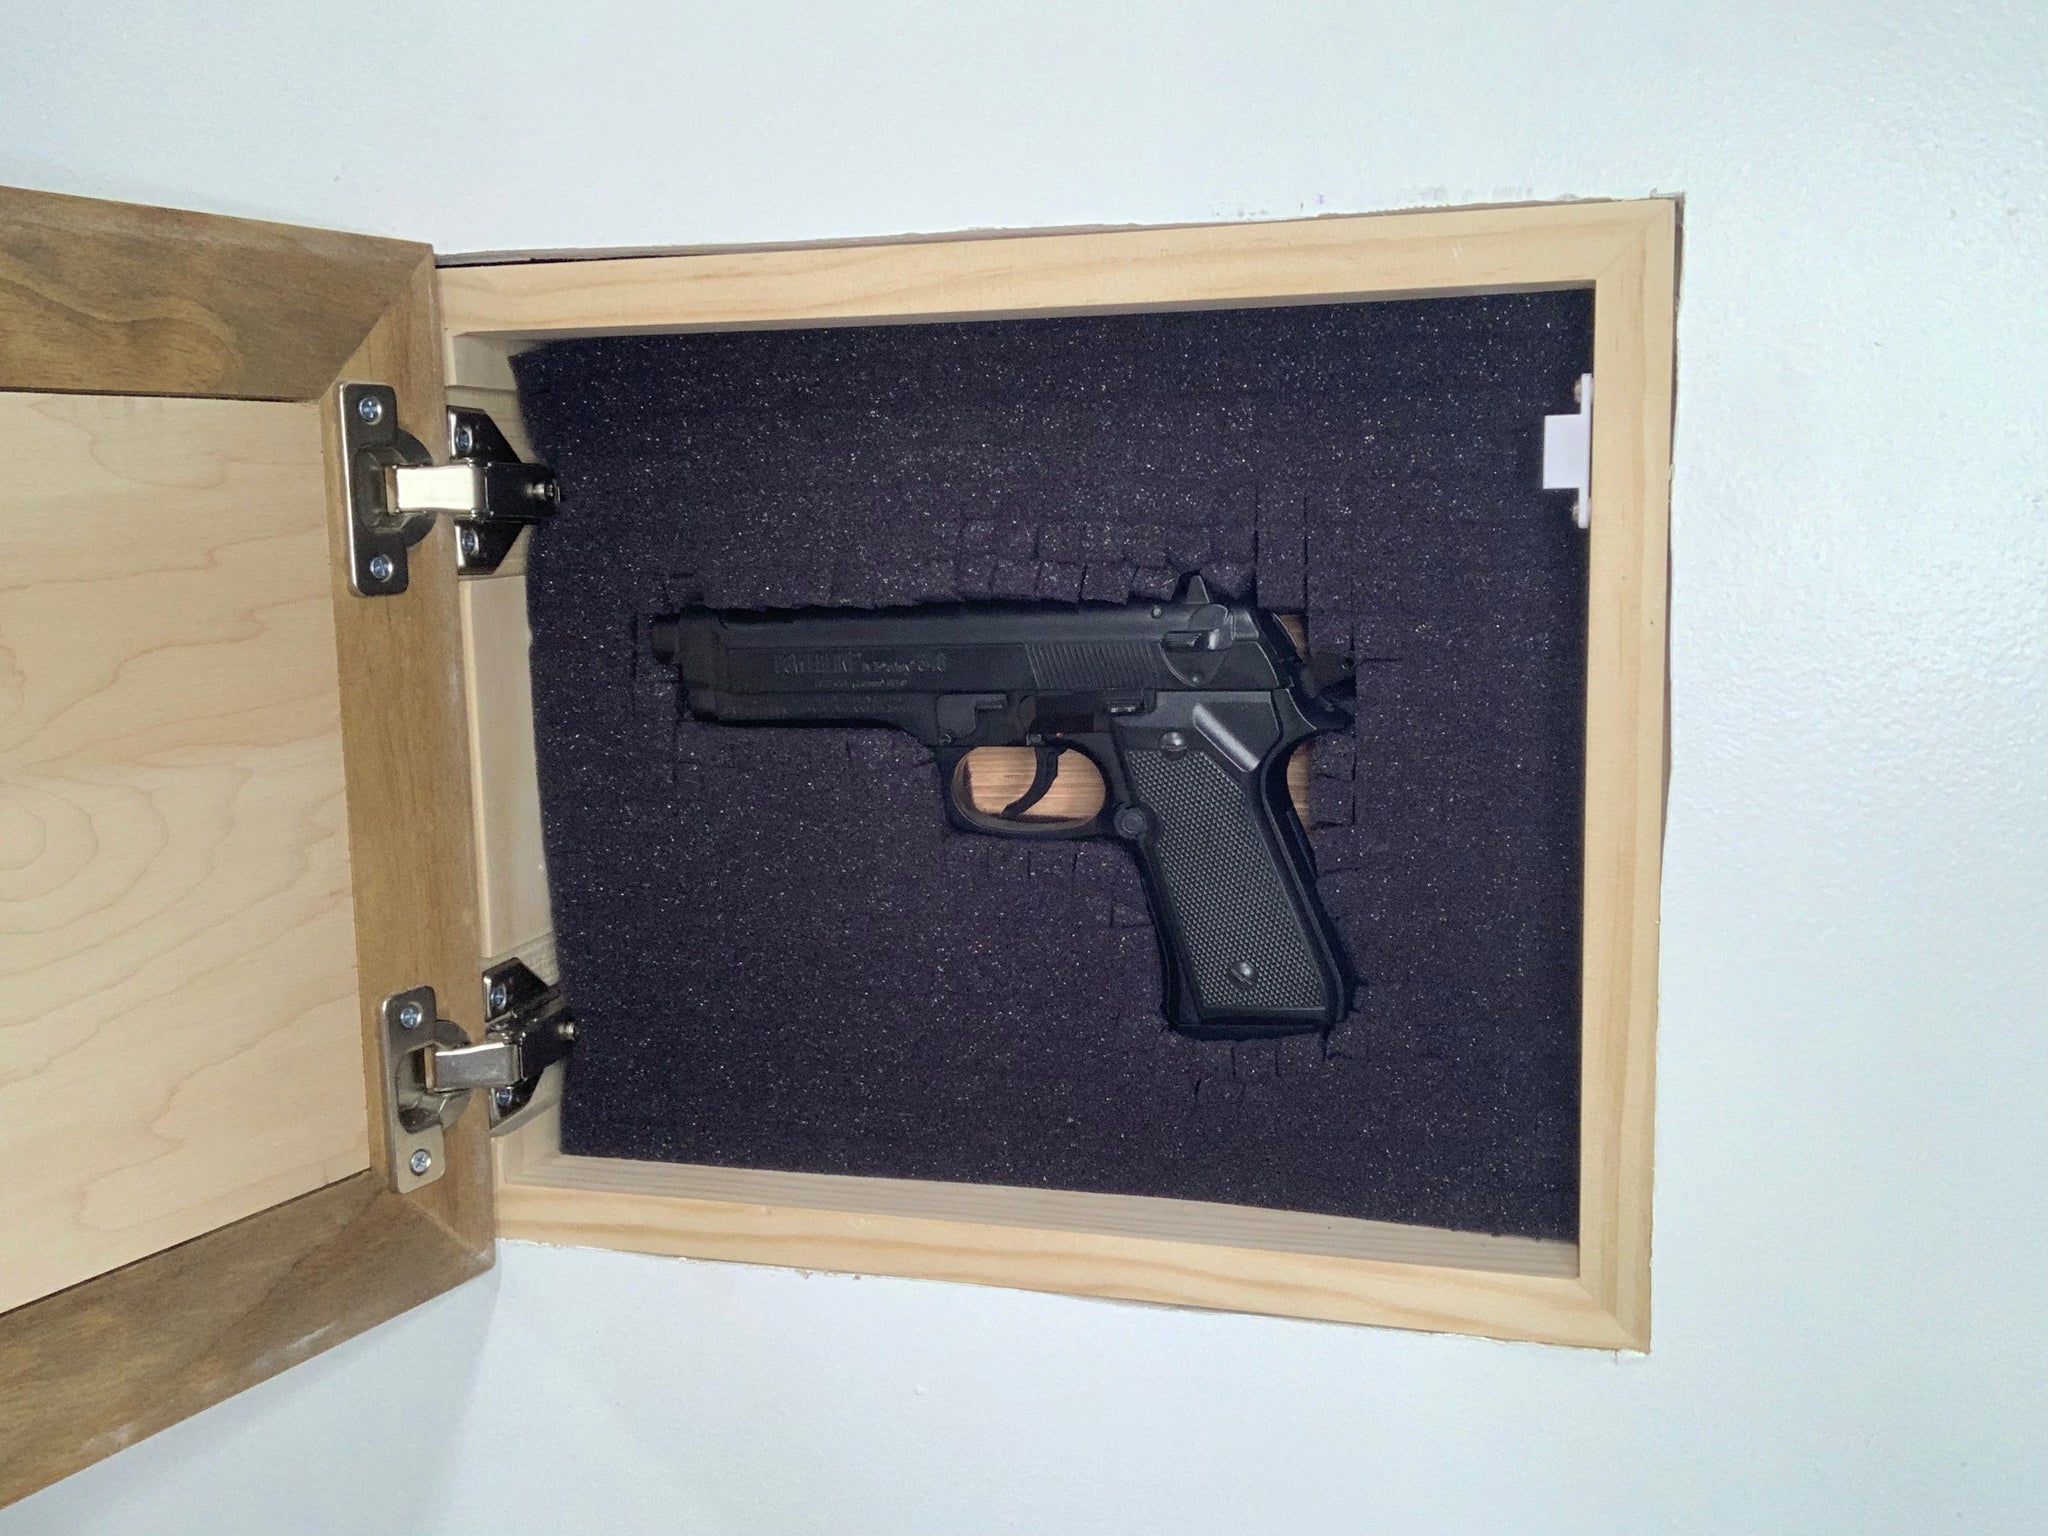
Step 10: That's it! You can now customize the included foam insert and safely and discreetly store your gun - no one will ever know what's behind the wall decoration!


